Welcome, wallpaper enthusiasts and DIY dreamers! Ready to transform your space with the magic of peel and stick wallpaper? Here at Peel & Paper, we believe that creating a stunning home should be accessible, enjoyable, and, yes, even a little bit addictive. Our premium peel and stick wallpapers offer a fantastic way to inject personality, texture, and style into any room without the fuss and commitment of traditional wallpaper.
But even with its user-friendly nature, achieving a truly professional finish with peel and stick wallpaper requires a bit of know-how. That's why we've created this ultimate guide, packed with information, invaluable tips and step-by-step instructions straight from the Peel & Paper experts, to ensure your project is a success. Get ready to elevate your walls like a seasoned pro!
Removable Wallpaper: A Design Revolution
Wallpaper has a rich and fascinating history, dating back centuries to ancient China where rice paper was used for wall decoration. Over time, wallpaper evolved through various printing techniques and materials, becoming a staple in interior design. However, traditional wallpaper installation often involves messy adhesives, meticulous alignment, and a significant degree of permanence, which can be daunting for many.
Enter peel and stick wallpaper, a game-changer in the world of home decor. This innovative product utilizes a self-adhesive backing, allowing for easy application and, crucially, removal. This flexibility has fueled its popularity, particularly among renters, DIY enthusiasts, and those who love to refresh their interiors frequently. As one of the top producers of custom peel and stick wallpaper in the world, always remember to choose The Original Peel & Paper.
The concept of self-adhesive wall coverings isn't entirely new, but advancements in material science and printing technology have led to the high-quality, stylish, and durable peel and stick wallpapers we see today. Modern peel and stick options, like those offered by Peel & Paper, boast vibrant designs, real paper texture, and strong adhesion that lasts, yet can be removed cleanly without damaging walls. This, along with their custom color options, has democratized interior design, empowering individuals to express their personal style with ease and without the commitment of traditional methods.
According to a report by Grand View Research, the global wallpaper market was valued at USD 1.8 billion in 2023. The removable wallpaper segment in particular is experiencing significant growth, and this surge in popularity underscores the demand for convenient and stylish decorating solutions. Peel and stick wallpaper perfectly caters to this demand, offering a blend of aesthetics and practicality.
Your Official Peel & Paper Installation Guide: Straight from the Source
At Peel & Paper, we've meticulously crafted our wallpapers and instructions to ensure a smooth and satisfying installation experience. Here is the comprehensive guide:
Tools You’ll Need:
- Clean, lint-free cloth or sponge
- Measuring tape
- Pencil
- Spirit level, plumb line, or laser level
- Utility knife with a sharp blade
- Felt smoothing tool (included in your order)
- Step ladder (if needed)
Surface Preparation is Key:
- Clean Walls: Ensure your walls are clean, dry, and free of dust, dirt, grease, and any loose particles. Wipe down walls with a damp cloth or sponge and allow them to dry completely.
- Smooth Surfaces: Peel & Paper adheres best to smooth, non-porous surfaces. If your walls have texture, such as heavy orange peel, the wallpaper may not adhere well or the texture may show through. For best results on textured walls, opt for our Paste-the-Wall Wallpaper, or our Peel & Stick Vinyl - see more about our other paper types.
- Painted Walls: Newly painted walls should be allowed to cure for at least 4 weeks before applying Peel & Paper wallpaper. Fresh paint can release gases that may interfere with the adhesive.
- Priming Walls (Optional): Consider priming the wall if you have a porous wall surface, or old flaky paint. Remember to leave the primer for 4 weeks to fully gas-off.
Getting Started:
- Unroll and Inspect: Carefully unroll your Peel & Paper wallpaper and inspect it for any damage or printing flaws. Lay the rolls flat for 24 hours to allow them to relax and acclimatise.
- Plan Your Layout: Before you start peeling, plan the placement of your first panel and measure as per the instructions. Consider any architectural features, windows, or doors.
- Mark a Vertical: Measure out where the first panel will sit, and make a vertical line. Use a level and pencil to draw a light, vertical guideline on your wall where the first panel will be placed. This will help ensure the rest of your panels are straight, so take your time and make sure this is perfect.
-
Start with Panel 2: Apply panel 2 first, as this will avoid the adjacent wall interfering with the wallpaper and make it easier to get a nice straight panel. You should spend most of your time on this panel to make sure it is perfect as it will affect every subsequent panel.
Applying Your Peel & Paper:
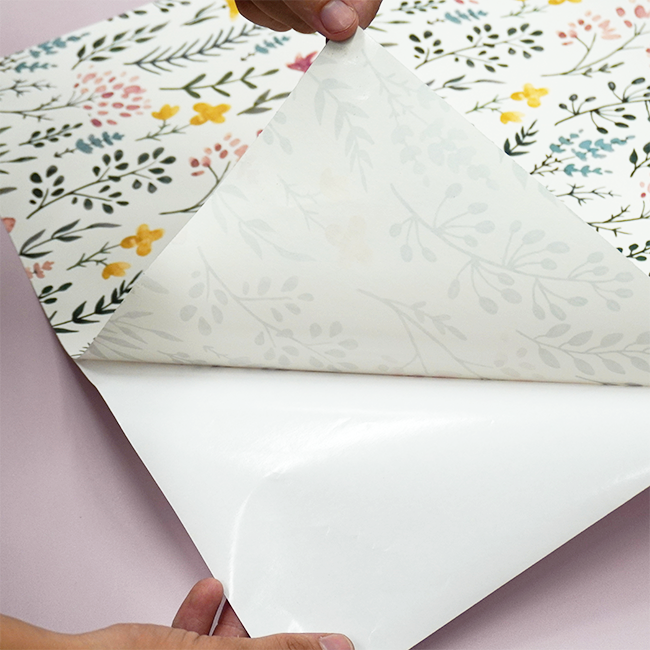
- Peel a Small Section: Starting at the top of the panel, carefully peel away about 6-12 inches of the backing paper, exposing the adhesive. Avoid peeling the entire backing off at once, as this can make the wallpaper difficult to control and may cause it to stick to itself.
- Align and Position: Align the top edge of the wallpaper panel with your ceiling line (or the top of your measured area), leaving a 1 inch overlap for trimming. Use your vertical guideline to ensure the panel is straight.
- Smooth as You Go: Gently press the exposed adhesive section of the wallpaper onto the wall. Use your smoothing tool (included in your order) to smooth the wallpaper from the center outwards, working your way down. Apply firm, even pressure to remove any air bubbles. If you encounter a large air bubble, you can carefully lift a small section of the wallpaper and re-smooth.
- Continue Peeling and Smoothing: Slowly peel away more of the backing paper, a few inches at a time, while continuing to smooth the wallpaper onto the wall. Work methodically to avoid wrinkles and air pockets.
- Repeat for Subsequent Panels: Repeat steps 1-4 for the remaining panels, carefully aligning the patterns and ensuring each panel is straight using your level and vertical guidelines.
- Trim Excess: Once your wallpaper is fully applied, use a sharp utility knife to trim any excess wallpaper at the top and bottom. Use a straight edge (like a level or ruler) as a guide for a clean cut. Ensure your blade is sharp to prevent tearing.
Tips for a Perfect Finish:
- Work Slowly and Carefully: Patience is key! Take your time and focus on aligning each panel accurately. The first panel you apply (panel 2) will shape the rest of the installation, so especially take your time with this one.
- Don’t Be Afraid to Reposition: Peel & Paper is designed to be repositionable during installation. If you’re not happy with the alignment, gently peel the panel back and reapply.
- Match Patterns Carefully: For patterned wallpapers, pay close attention to aligning the design seamlessly between panels. Some installers like to stick the matching edge first and then smooth across.
- Smooth Out Air Bubbles Immediately: Address any air bubbles as you go. Be careful trying to smooth down large bubbles as this could lead to creasing, so we recommend peeling back to release the air for these.
- Consider Working with a Partner: For larger projects or if you’re new to wallpapering, having a second pair of hands can be helpful for aligning and smoothing panels.
Removal:
When you’re ready for a change, removing Peel & Paper is easy. Simply start at a top or bottom corner and gently peel the wallpaper away from the wall at a slow and steady angle. Avoid pulling too quickly, as this could potentially damage the wall surface.
Pro Tips and Tricks for Peel & Stick Perfection
Now that you have the official Peel & Paper instructions, let's dive into some extra tips and tricks to elevate your installation to a truly professional level:
- The Importance of a Clean Start: Peel & Paper emphasizes clean, dry walls, and this cannot be overstated. Even seemingly clean walls can harbor dust and oils that hinder adhesion. For kitchens and bathrooms, where grease and moisture are more prevalent, a thorough cleaning with a degreasing solution followed by a complete drying period is recommended.
-
Dealing with Obstacles Like Outlets and Light Switches:
- Measure Carefully: Before applying the wallpaper over an outlet or switch, carefully measure its dimensions and location on the panel.
- Make Initial Cuts: Using your measurements, make an "X" cut in the wallpaper where the outlet/switch will be.
- Smooth Around the Edges: Smooth the wallpaper around the edges of the outlet/switch plate.
- Trim Neatly: Use your utility knife to carefully trim away the excess wallpaper, leaving a clean opening. Replace the outlet/switch cover.
- Addressing Bubbles and Wrinkles Like a Pro: While smoothing, you might encounter stubborn air bubbles or wrinkles. For small bubbles, try gently pressing and working the air towards the edge. For larger bubbles, it would be best to remove and reapply, or alternatively a pinprick can release the air and allow smoothing. For wrinkles, carefully peel back the affected section and reapply, ensuring even pressure and keeping the paper taut.
- The Power of a Good Smoothing Tool: Your order will come with a smoothing tool (squeegee). It has a felt covering to provide a smooth, non-scratch surface. Applying even pressure with the tool is key to a bubble-free finish and proper adhesion.
- Working in Good Lighting: Ensure your workspace is well-lit. This will help you see any imperfections, misalignments, or bubbles more easily.
- Take Breaks: Wallpapering, especially larger rooms, can be physically demanding. Take breaks to avoid fatigue and maintain focus. One of the helpful aspects of peel & stick wallpaper is that the adhesive doesn't dry, so you can pick up right where you left off after any amount of time.
- Don't Be Afraid to Start Over (Within Reason): One of the beauties of Peel & Paper is its repositionability. If your first panel is significantly misaligned, don't hesitate to gently peel it off and try again.
- Document Your Work: Take photos of your finished project! We love to see how our Peel & Paper transforms your spaces. Share your creations on social media and tag us!
Beginner Mistakes to Avoid
Even with careful planning, beginners can sometimes encounter a few common pitfalls. Here's what to watch out for:
- Skipping Surface Preparation: This is the number one culprit for adhesion issues. Don't underestimate the importance of clean, dry, and smooth walls.
-
No Acclimatisation: This is a common cause of shrinkage and adhesion difficulty, so don't skip this step!
- Rushing the Application: Peel and stick wallpaper is forgiving, but rushing can lead to misalignment, bubbles, and wrinkles. Take your time and focus on accuracy. Remember you can always leave it and come back to it another day.
- Not Using a Level: Eyeballing it can lead to crooked panels, which will be noticeable as you continue the installation. Use a level to ensure your initial guideline and each subsequent panel are straight.
- Peeling Off Too Much Backing at Once: This makes the wallpaper difficult to handle and increases the risk of it sticking to itself. Peel the backing gradually as you apply.
- Using a Dull Blade for Trimming: A dull blade will tear the wallpaper instead of cutting it cleanly, resulting in a frayed edge. Use a sharp blade and change it frequently.
- Ignoring Pattern Matching: If your wallpaper has a pattern, take the time to understand the repeat and align the panels carefully for a seamless look.
Ready to Transform Your Walls?
Installing Peel & Paper wallpaper is an exciting and rewarding DIY project. By understanding the fundamentals, following our detailed instructions, and incorporating these pro tips, you'll be well-equipped to achieve a flawless, professional-looking finish. So, browse our stunning collection, choose the perfect design to reflect your style, and get ready to unleash your inner decorator. Happy wallpapering from all of us at Peel & Paper!